Farming and Item Drop amplifiers

    Материал из Wikipedia Tales of Pirates
    Другие языки:

    When player kills monsters (farming), monsters drop items. Item drop rate is calculated using the drop formula. To increase item drop rate, player can use different drop amplifiers. All amplifiers do not directly increase the drop rate, but increase the drop rate multiplier.

    • Server Drop rates by default: 3x

    Drop formula

    Item drop rate from monsters are calculated using the formula:

    Final drop rate = Base * (Rate + Amplification + Fairy*0.02 + HandPet + Vip), where:

    Base is the base drop chance of a particular item, as shown in database.

    Rate is current server drop rates (by default: 2x)

    Amplification is Drop amplifier

    Fairy is level of 2nd gen fairy pet during turned on skill "Fairy body" (possession)

    HandPet is presence of rare hand pet. If character has equipped rare hand pet, value: 0.05, otherwise: 0

    Vip is presence of premium status. If it is not activated, then the value is: 0. If premium is activated, then the value, depending on the level of premium status:

    Level IMPs purchased Drop multiplier bonus
    Lv 1 0 0.10
    Lv 2 10 000+ 0.15
    Lv 3 35 000+ 0.20
    Lv 4 100 000+ 0.25
    Lv 5 250 000+ 0.30
    Lv 6 500 000+ 0.35

    Examples

    If the base drop rate of an item is 1%, and the character is NOT using drop amplifiers, possession, rare handpet, premium status, then:

    Final drop rate = 1% * (2 + 0 + 0*0.02 + 0 + 0) = 2%

    If the base drop rate of an item is 1%, and the character is using only Hi-Amplifier of Luck and character is NOT using possession, rare handpet, premium status, then:

    Final drop rate = 1% * (2 + 3 + 0*0.02 + 0 + 0) = 5%

    If the base drop rate of an item is 1%, and the character is using Hi-Amplifier of Luck, possession with lv41 fairy pet, rare handpet, premium status Lv 2, then:

    Final drop rate = 1% * (2 + 3 + 41*0.02 + 0.05 + 0.15) = 6.02%

    Drop amplifiers

    Item Effect Duration Requirements
    File:Lots 03 CB.png Charmed berry Adds +2 (200%) to Drop rate multiplier 15 min Any level
    File:N1398.png Amplifier of Luck Adds +2 (200%) to Drop rate multiplier 30 min Any level
    File:s7094.png Gold Charmed Berry Adds +2.5 (250%) to Drop rate multiplier 15 min Any level
    File:N1205.png Super Lucky Fruit Adds +3 (300%) to Drop rate multiplier 15 min 45+ level
    File:N1355.png Hi-Amplifier of Luck Adds +3 (300%) to Drop rate multiplier 30 min 60+ level
    File:S3881.png Great Lucky Fruit Adds +3,5 (350%) to Drop rate multiplier 15 min 45+ level
    File:T7018.png Huge Amplifier of Luck Adds +3.5 (350%) to Drop rate multiplier 30 min 60+ level
    File:s19965.png Boost Pack 6 (Luck) Adds +3.5 (350%) to Drop rate multiplier 30 min 60+ level
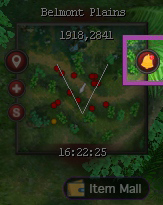
    File:T bell.png Ringing of the Golden Roger Adds +0.5x to current server drop rates and exp rates 1 hour Any level of character. To turn bell on, you need to press the bell button on the minimap, and 750 IMPs will be written off from your account. Only one bell per server can be used at a time. Valid for all server players. All players see the notification about the usage of the bell.
    To turn Ringing of the Golden Roger on, you need to press the bell button on the minimap
    • Ringing of the Golden Roger is activated by pressing the bell button on the minimap, and 750 IMPs will be written off from your account.
    • The character can get the effect of the Charmed Berry when used fortune lots.
    • Hi-Amplifier of Luck can be produced by manufacturing.
    • Untradeable Super Lucky Fruit can be get as Daily reward.
    • There is no way to get Gold Charmed Berry in the game at the moment.
    • Great Lucky Fruit can be obtained by killing the main bosses of FC, DS, DW 1 and DW 2.
    • Great Lucky Fruit, Huge Amplifier of Luck and Boost Pack 6 (Luck) can be purchased from Item Mall for IMPs only.

    Hourglass

    Hourglass is an item that gives the character bonuses: x2 experience for killing monsters and +2 to drop multiplier. Hourglass effects don't stack with all other exp and drop bonuses.

    Where to get an hourglass

    Level 40+ character can take Hourglass 1 time per day for free from Baby in Argent (2202,2776). Hourglass is valid for 60 minutes and is active when the item is in the 1st inventory cell. The effect of Hourglass can be stopped by dragging Hourglass to another cell. After 60 minutes, Hourglass will automatically be removed. If Hourglass is left over from the previous day, the character can still take new Hourglass as soon as he runs out of the old ones or gets rid of them.

    How to check the current drop rate in the game

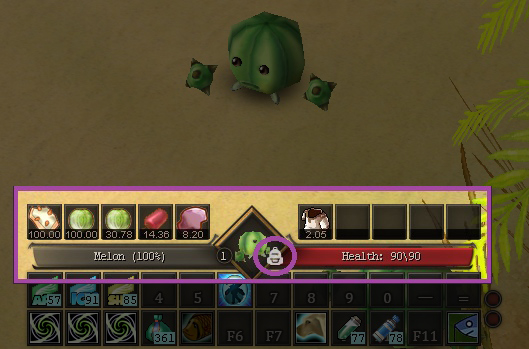
    The player can check in real time the current item drop rate of a particular monster, taking into account all multipliers that are currently affecting the character. To do this, you need to right-click on the monster or start attacking the monster, and then click on the backpack icon above the quick access panel.

    File:Drop 01.jpg

    Quest items

    The drop rate of quest items is calculated using the same formula, however, these items can only drop if the monster is finished off (deals final damage) by a character who currently has an active quest to obtain this item. For example, during the compeleting of one of the story quests, you need to get a quest item from the Mermaid Queen. To simplify the task, the player can deal 95% damage to the Queen with the help of his other character, voyager with sea skills and a good ship, but the last 5% of the damage must be done by the main character who is compeleting the quest, otherwise the desired item will not drop, even if drop rate is 100%.

    Resource drop rate

    During woodcutting, sea fishing and land fishing, resource drop rate is equal to their base drop rate. There are special resource drop rates, which is 1x by default. None of the above amplifiers and multipliers affect the resource drop rates.

    "Drop reset" tactics during bossing

    During killing bosses with a large amount of HP, a drop multiplier is applied to the dropped items, which is currently in effect on the character to whom the drop is temporarily "attached".

    The mechanics of the work of "binding a drop" for a character has many nuances and implicit situations, which cannot be described with 100% accuracy.

    In most cases, when killing a mob or boss, the following statement is true: the drop is "assigned" to the character who dealt the first damage and maintained the damage at a sufficient level relative to other sources of damage during the killing of the boss. If during this time there were pk for the boss or frequent deaths of the characters who dealed damage to boss, and it is not possible to determine who the "drop was assigned to", then the guilds use the "reset" tactic. The whole guild together knocks down the boss's HP, leaving 1% or less, and then waits for several minutes without inflicting any damage to the boss, so that the boss has time to "forget" all the damage done. After some time, the strongest character in the guild turns on the possession and uses the drop amplifier, and then finishes off the boss to the end, inflicting a "new" first damage to boss, along with which a new drop multiplier is applied to the boss, which will continue to operate until the boss dies.

    Detailed comment
    • It is important to understand that "boss aggro" is not equal to "fixing the drop", despite the fact that, most often, in practice, the boss "aggresses" exactly on the one who the "drop is fixed" on. But there are times when the damage dealer who dealt the first damage loses the "boss aggro", but the drop remains "attached to him". This can happen if the DD is not strong enough, or if he is prevented from maintaining the same damage dealt to the boss during active combat. In this case, "boss aggro" goes to the player who caused the most damage, according to the boss, for a certain period of time. However, the character that dealt the first damage continues to maintain it at a certain level and does not die or leave the location. And if the boss will be killed, then it is this player who will take the drop.
    • There are many nuances that work for "binding a drop", but they are unstable, and it is impossible to argue that the behavior of the "binding" will be exactly this in a particular case. One of these is the priority of physical damage over magical. Under some circumstances, you can take a drop from the character who dealt the first damage, and maintain it. If you have enough physical dps, at the same time, sometimes a one-time physical damage is enough, which no longer "stacks" with the "re-damage" mechanic. But there is another nuance: there is no logical division into damage types in the game. At all. And how the game defines this case is not entirely clear, however, in practice, this happens.
    • "Redamage" is another implicit mechanic that allows you to take a drop from the character who dealt the first damage and maintain it. Most often, it manifests itself if the character that caused the first damage is not physically allowed to maintain it, or the difference in the dps of the characters is too great and the second damage dealer will easily take the drop on itself.
    • Another strange mechanic is the "botched drop". This happens in the intervals when the drop is redefined, or the game cannot accurately understand whose drop it is, since there is a constant change of damage dealers due to their deaths during pk. In such cases, the drop is highly likely to be given to the character that caused even the most minor damage, for example, supports. And when finishing off the boss, they simply didn’t manage to get enough damage, or, the damage was not considered sufficient for an unknown reason. As a result, the game did not determine the finisher. In such situations, even items with a 100% drop rate may not drop out. The exact reason for this behavior is unknown. An interesting point is that if a system notification is attached to the boss, then a character who has not participated in dealing damage for a significant time can become the killer of the boss. The reasons are also unclear. This is probably a bug left by the original game developers. The case is extremely rare and practically unreproducible.
    • There is also a similar strange mechanic when a drop is given to a character who in no way could get enough dps to receive it, or did not deal damage for a very long time.
    • The mob perceives healing as damage on its own, if you heal the character on which it is "aggroed". It is important to note that if you heal a character who has full HP, the mob will not pay attention. Contrary to popular belief, healers do not "cut" drop rate. A healer can "ruin" a drop rate only in one case: when the heal was considered as the first damage and when finishing off the mob, not enough damage was dealt to "overdamage" the heal. This can happen when finishing off a mob or boss, the damage dealer that the mob was aggroing on did not deal any damage for a long time, and the mob did not receive any damage from other characters nearby. Then, when healed, it is the heal that will be the first damage and break the drop. If you heal a damage dealer that keeps DPS stable, then nothing will happen. Also, if you heal a damage dealer with full health. Healing from the rebirth skill of the Cleric is completely ignored by mobs and the system of aggro and drop.
    • The drop cannot be "cut" at all by inflicting damage parallel to the main damage dealer. This only happens if the damage dealer is not able to maintain a certain level of damage, and the drop goes to a character that does not have amplifiers used, or drop "breaks" in rare cases. If all damage dealers that deal damage use the same amplifiers, when you need to finish off the boss quickly and there is no time to find out who the drop is "binded" to or there is no time for resetting, then nothing bad will happen.


    List of guides
    Server Description Conception and server ratesServer time
    Newbie guide How to start playingWhat activities exist on the serverHow to make money on the server
    Races and classes Guides 49.png General description of races and classesGuides 50.png CrusaderGuides 51.png ChampionGuides 52.png SharpshooterGuides 53.png VoyagerGuides 54.png ClericGuides 55.png Seal MasterGuides 56.png Class change
    Quests Guides 02.png Class questsGuides 03.png Story questsGuides 04.png Language barrierGuides 01.png Phoenix RebirthGuides 05.png HexathlonGuides 06.png Vampiric Aries Palace (Horoscope)
    Life skills Guides 77.png Life skill pointsGuides 68.png StallGuides 69.png WoodcuttingGuides 70.png Fishing (ship)Guides 78.png BlueprintsGuides 71.png CraftingGuides 73.png ManufacturingGuides 72.png CookingGuides 74.png AnalyzeGuides 75.png Land Fishing and Butchering fishGuides 76.png Alchemy
    Equipment Guides 07.png EquipmentGuides 08.png Fairy PetGuides 09.png Hand pet (Lootpet)Guides 10.png MountGuides 11.png CoralsGuides 12.png RingsGuides 13.png NecklacesGuides 14.png CloakGuides 15.png Bracelets, handguards and beltsGuides 16.png Strengthening equipmentGuides 17.png Equipment slots (socket set)Guides 18.png GemsGuides 19.png Gems combiningGuides 20.png Gems forgingGuides 87.png Transferring gems to other equipmentGuides 21.png Gems extraction (pliers)Guides 22.png ApparelsGuides 79.png HairstylesGuides 48.png WingsGuides 29.png AurasRelik.png Relic System
    Mazes and maps Guides 61.png Description and schedule of mazesGuides 80.png Forsaken City (FC)Guides 81.png Dark Swamp (DS)Guides 82.png Demonic World (DW)Guides 83.png Eternal garden (EG)Guides 84.png ChaosGuides 85.png Dragons Lair (BD)SNV.png Snow War (SW)
    Bosses Guides 57.png Mini BossesGuides 58.png Jade BossesGuides 59.png Legendary BossesGuides 60.png Sea Bosses
    Items Guides 24.png Inert Dust, Inert Stones, and Elemental StonesGuides 25.png Kal RunestoneGuides 26.png SparksGuides 27.png Potions and other consumable items for combat
    Gameplay Guides 30.png List of NPCGuides 31.png Character leveling and Exp amplifiersGuides 32.png Farming and Item Drop amplifiersGuides 33.png Premium statusGuides 44.png Characters statsGuides 43.png GuildsGuides 34.png ReputationGuides 35.png New Sheepskin Scroll (NSS)Guides 36.png Old Sheepskin Scroll (OSS)Guides 37.png Fortune lotsGuides 38.png ShipsGuides 42.png Daily rewardsGuides 40.png Evil crystalGuides 45.png Friendship (skill)Guides 41.png Prison island (bots)
    Item Mall (IM) Guides 46.png How to purchase IMPsGuides 47.png How to use item mall (IM)
    Interface Launcher and settingsHotkeysAuto movementOffline mode
    Technical questions TweaksHow to install the game on MacOSHow to switch language in gameSecret codeHow to change account passwordHow to change character nicknameHow to change emailServer linksProblem with damage effects(visual)